Monday, June 28, 2010

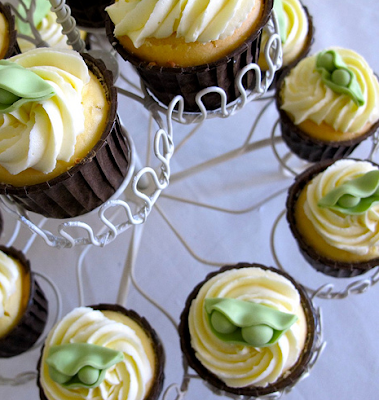
Vanilla Cupcakes


I have to apologise it has been soooooooooooo long since l have written a post it's almost embarrassing!

But I just had to share this recipe with you, on the weekend l celebrated my birthday with my family. Most people can't believe that l would even contemplate making my own cake but for me l see this as a chance to make something just for me.

The top cake was a Chocolate Mud Cake and the cupcakes were Vanilla, my husband has just finished cupcake and announced these are the best cupcakes he has ever had. I was kindly given this recipe from one of the students at Planet Cake

Cupcakes
120g butter, softened (the softened butter should be easy to cut through)
150g (2/3 cup) caster sugar
1 teaspoon (5ml) vanilla extract
2 large eggs (we use eggs with a minimum weight of 59g)
188g (1 1/4 cups) self-raising flour
125ml (1/2 cup) milk

Preheat oven to 180 degrees Celsius (160 degrees Celsius fan-forced). If you are not using a fan-forced oven, adjust the oven rack to the middle of the oven.

Line twelve 1/3-cup capacity muffin pan holes with cases that are about 3cm high and measure about 5cm across the base and 8cm across the top. We use paper-lined foil cases.

Using an electric mixer or electric hand-held beaters, beat the butter, sugar and vanilla together in a large bowl, starting on low speed and increasing to high once the sugar is incorporated. Beat until the mixture is pale and creamy, stopping the machine once or twice during beating to scrape down the side and base of the bowl with a spatula.

Add one egg to the butter mixture and beat for about a minute. Stop the machine and scrape down the side and base of the bowl. Repeat with remaining egg.

Sift about half the flour (about 2/3 cup) over the butter mixture. Stir with a spoon or beat with the electric mixer/beaters on very low speed until the flour is just incorporated.

Add about half the milk (about 1/4 cup) and stir or beat on very low speed until just combined. The mixture will probably look curdled at this stage. Repeat the process with the remaining flour and milk. Do not overmix the batter.

Divide the mixture evenly among the cases (about 1/4 cup batter per case).

Bake for about 20 minutes, until the cupcakes are light golden. When they are ready, a skewer or thin-bladed knife inserted into the centre of a cupcake will come out without any batter attached, and the cupcakes should spring back when lightly pressed in the centre.

I also made these cupcakes as well for my sons Grade Six Buddy


I can't recommend them highly enough!

Yvette x

Wednesday, May 5, 2010

Competition TIme


Baking Addict is having it's first competition, if you would like the chance to win one of my creations just join Baking Addict's Facebook Fan Page and leave a comment "Yes Please" on the Circus Tent Photo.


The only rule is that you have to live or have a drop off destination within a 15 km radius of Mentone, Victoria. The cake will be delivered on the 31st May, please note the photo of the Circus Tent is an example of what l will be making there may be some slight differences. Competition Closes May 15th 2010, good luck!


Yvette x

Monday, May 3, 2010

Backpack ,Backpack

I've been going crazy singing the Dora Theme Song "Backpack Backpack" but it was all for good cause. These cupcakes and cookies were made for a little girls 3rd birthday.


Enjoy!

Y x


Saturday, April 24, 2010

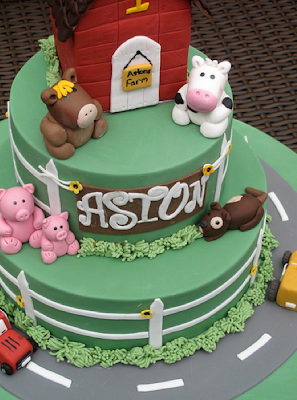
Old McDonald had a farm....

Just a glimpse of a cake l've just finished, it was so much fun to make! Perfect for a 1st Birthday.

The top tier is a chocolate Mud Cake and the bottom is White Chocolate Mud.

Enjoy!

Yx


Saturday, April 17, 2010

The perfect cake topper

I recently attended another Planet Cake Course, we made Bride and Groom Figurines. I'm slowly working my way around all of the classes and am having a ball doing it.

I just love this couple especially the detail on the back of the brides dress, it was so much fun making them and l can't wait to make another one!

Enjoy!

Yx


Wednesday, April 14, 2010

Babushka Doll Cupakes


It feels like ages since l've posted on here, probably because it has been!

Business is really picking up which is wonderful, that together with working for Planet Cake and keeping up with Cooper and Hamish's lifestyle = One busy mummy. But l wouldn't have it any other way.

Next week l am having a few mum's from school coming over to learn about all things cupcakes, every one is really excited l hope l don't disappoint them. I'll post some photos of their wonderful creations on here!

Above are some cupcakes l made for a friend who just loves babushkas, I packed them in little noodle boxes and they were given out as thank you gifts.


Enjoy!

Y x

Thursday, April 1, 2010

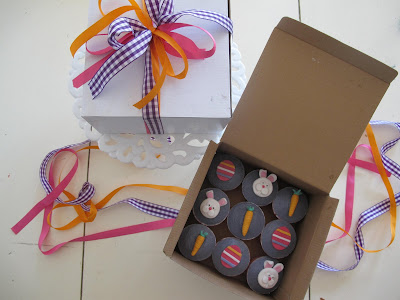
Easter Treats and packaging tips


I woke up in the middle of the night and had a mild panic attack, I had totally forgotten to make some thing for Hamish's teachers. Will said don't worry they won't mind, but a friend of mine who is a teacher said we always remember parent's who don't give gifts!.

So I whipped up some of my favourite Gingerbread cookies and we were all good to go. But l simply couldn't just give them cookies on a plate, I find there's nothing nicer then receiving a present thats packaged just as nicely as the gift itself!

I've always disliked spending huge amounts of money on cards, wrapping paper and everything that goes with it. But now l've discovered some great Two Dollar stores theres nothing more that l enjoy then hunting for my next treasures.

When l wrap a gift I tend to find three ribbons with differing colours and or patterns (such as gingham or polka dot) that compliment the gift. The ones l used below were $2.00 each for 3 metres, there was more then enough left over for one or two more gifts.

The box or wrapping paper needs to be a solid colour, l love to using neutral tones as I find them to be more effective. You can find some great boxes at the cheaper shops like the Reject Shop.

There are also some fabulous tissue papers available. I've always wondered why tissue paper had to be so boring but now there some great designs such as the polka one l used below.


Enjoy!

Y x


Friday, March 26, 2010

Easter's just around the corner....


Cooper has just finished his first term at school, it only feels like yesterday that he started. I made these delicious cupcakes for Cooper's Teachers, I made "the best ever chocolate cupcakes" again . I can't tell you enough how good they are. I got the cute design from a FlickR Member The Frosted Cake and Cookie.

I iced the cupcakes with Italian Meringue Buttercream after having seen it on Cake Journals Website , the icing was beautifully smooth and really easy to work with. It does take quite a bit longer then regular buttercream but it is well worth it!

Here is a picture of the cupcake all packed and ready to go,


Enjoy!

Yx

Thursday, March 25, 2010

A castle fit for a Princess!

I had so much fun making this cake, after having two boys it's so nice doing something really girlie!

Enjoy!

Yx


Monday, March 15, 2010

Buttercream Icing


I had some spare time today and with Cooper having a play date l thought l would whip up some cupcakes.

I wanted to try a new buttercream recipe, I stumbled across this one. I was quite intrigued with adding so much milk as well as the cornflour. I was quite surprised the icing was so light and fluffy, it actually had the same consistency as whipped cream it also doesn't have that overpowering butter taste.

Buttercream Icing

225grams of butter
1 cup of milk
1 cup of icing sugar
1 tsp of vanilla extract
2 tblsp of corn flour

Heat milk and cornflour on stove and whisk until mixture has thickened
Let it cool completely
Cream sugar and butter until light and fluffy
Add milk mixture and vanilla extract and whip until it has the same consistency as whipped cream.


By the way l just love this avocado green colour from Americolor.

Enjoy!

Y x

Saturday, March 13, 2010

Janes Baby Shower

The baby shower was a hit! The weather was perfect and everyone had a lovely time, here are some photos of the dessert bar.

Enjoy!

Yx


Thursday, March 11, 2010

Jam Sandwich Biscuits


It's been a while since my last recipe post! With Cooper at School and working l hardly have time to say boo, but this weekend is a special occasion I am hosting my best friends Baby Shower. She is having twins a boy and a girl, how cool is that.

I am organising a dessert buffet and these little treasures will fit in perfectly!

They are little bit time consuming but well worth the effort.

Makes approx 20

250g butter, softened
125g caster sugar
1 tsp vanilla extract
1 egg yolk
375g plain flour, sieved

200g raspberry jam
juice of 1 lemon

Preheat oven to 180c

Beat butter and sugar until pale & creamy.

Add vanilla and egg yolk and beat until just combined, then gradually stir in flour until the mixture comes together.

Wrap dough in plastic wrap and chill in fridge for 30mins.

On lightly floured surface roll the dough out to about 3-4mm thick and cut into 8cm rounds. Use a small cutter to remove the centre of half the rounds. Re-roll and cut out trimmings.

Bake in preheated oven for 10-12mins or until lightly golden. Transfer to cooling rack and leave to cool.

While the cookies are cooling, put the jam and lemon juice into a saucepan and heat it until it just comes to the boil, reduce and simmer for 2-3mins, then remove from the heat. Spoon about 1 tsp of jam over each of the whole cookies and top with cookies who have had the centre removed.

Store in an airtight container. Dust with icing sugar to serve

Enjoy!

Yx

Wednesday, March 3, 2010

I can't believe how lucky I am!

Never in my wildest dreams would l of thought l would have such an amazing job, I have to pinch myself every time l go to work.

This week l am completing Basics 104 and 106, this is one of the cakes. I think this would make the perfect Autumn/Winter Wedding Cake.

Enjoy Yx

Wednesday, February 24, 2010

Some exciting news!

I've been wanting to write about this for some time but wanted to make sure it was all formal before l blabbed ;-) A while back l was asked by Planet Cake if l would like to come and train as facilitator, now for all of you that have not heard of Planet Cake they are the Rolls Royce of Cakes.

So as you can imagine I am over the moon, to be able to work with some of the top Cake designers in Australia is just a dream come true. I had my first day on Monday and was floating on a cloud.

I thought l would give you a peak of some of their work, They recently made a birthday cake for Rihanna who's touring Australia, below is a picture of her cake.

and Jennifer Hawkins....
and Cate Blanchett...

Sunday, February 21, 2010

Awesome Banana Muffins


I love it when l see unwanted banana's in the fruit bowl, our family are quite the banana snobs. I know it sounds pathetic but we only tend to eat banana's with perfect skins, it often takes me a good ten minutes to find the perfect ones.

I stumbled across this recipe on the Cat Can Cook blog, they were simply titled "awesome banana muffins" and with 560 positive comments l couldn't wait to try them.

The muffins were delicious, and extremely light!

Banana Muffins (makes 12 muffins)

3 or 4 Large bananas, mashed

1/2 cup white sugar (original recipe calls for 1 cup, but I don’t like them too sweet)

1 slightly beaten egg

1/3 cup butter

1 teaspoon baking soda

1 teaspoon baking powder

1/2 teaspoon salt

1 1/2 cups flour

Heat oven 180'

Mix the mashed banana, sugar, egg and butter together. Set aside. In a separate bowl, mix together baking soda, baking powder, salt and flour. Mix wet and dry ingredients all together! Pour into greased muffin tins, and bake in 180' oven for approximately 20 minutes.

Enjoy!

Yx

Monday, February 15, 2010

Valentines Day Love Cakes

After baking for a whole week I wasn't going to do anything for Valentines Day, but when my last order for the week went out I was compelled to get back into the kitchen.

I've probably mentioned a million times that my family love anything with zest in them, so for something different l thought l would give them a double hit of both orange and lemon.

Sundays afternoon are always spent down at my mums house as apparently Will thinks the tea tastes better there ;-) We brought them along and Will and the kids greedily gobbled them all up barely leaving any for anyone else.

I got the recipe from Recipezaar, and just added the zest of one orange.

Enjoy!

Yx


Sunday, February 14, 2010

Latest creations

Sorry for the lack of posts but l have really busy with cake orders and school activities, just thought l would share some of the things l have been working on!

Enjoy!

Y x


Sunday, January 31, 2010

The best ever Chocolate Cup Cakes


Now there are a few reasons why l never bake Chocolate Cupcakes, a) my children don't like chocolate (sacrilege I know) and b) I've never found a recipe that i've been completely happy with. Well that all changed last week when l stumbled across this recipe, my husband ate five of them in a row.

I adapted this recipe, but for the life of me I can't find the original one anywhere.

I made these for a Hen's day dessert buffet, here are a few other photos of the buffet.


The recipe makes 12

230g butter
4 tbsp cocoa powder
1 cup boiling water
2 cups self raising flour
2 cups of sugar
1/2 cup butter milk
2 eggs
1 tsp vanilla

Heat oven to 180'c

In saucepan melt butter, add cocoa to the melted butter and stir. Add in boiling water and let it boil for 30 seconds, then turn off heat and set aside.

In a large bowl mix together flour and sugar. Pour in chocolate mixture and mix together just until combined.

In a separate bowl combine buttermilk and eggs and beat. Add in vanilla and mix together well.

Pour into chocolate mixture and mix well.


Wednesday, January 27, 2010

Roses upon Roses


It's my son Coopers last day at day care today, he is so excited but unfortunately l don't think he realises that when he starts school he's not going to have wonderful hot lunches and be able to play all day! I hope it isn't too much of a shock for him.

I decided to make a cake to say thank you for the carers, they take care of him like he was their own.

The cake is a vanilla butter cake, I was given this recipe from a lady l went to cake school with. I have had the recipe sitting in my to make basket for quite some time, after making it I can't believe l waited so long to make it.

Vanilla Butter Cake

Heat Oven to 180 deg / 160 fan forced cooking time around 50 - 55 mins

Grease and 8" round tin

220 gr caster sugar

250gr softened butter

250gr plain flour

1 teaspoon vanilla extract

3 teaspoons of baking powder

3 eggs at room temperature

125 mls buttermilk at room temperature

Beat butter until soft and fluffy for a minute or so, then start adding the caster sugar gradually so as not to choke the butter.

Cream the butter and sugar together

Then add the vanilla extract.

Add the eggs one by one beating well after each addition.

Add the sifted flour and baking powder

Fold in the flour gently by hand using a metal spoon, alternating with the addition of the buttermilk.


I also used this recipe to make this Mickey Mouse Cake.


Enjoy!

Y x

Sunday, January 24, 2010

Australia Day Lamingtons


Australia Day apart from being a great long weekend is our national day where we commemorate the landing of the First Fleet in Sydney Cove in 1788. We typically celebrate it with a BBQ with plenty of sausages (snags) and chops and lots of fresh salads and following lunch and abundance of Pavlova topped with freshly whipped cream and fruit.

So in preparation for Australia day l made some Lamingtons, Lamingtons are delicious squares of sponge cake that are covered in Chocolate Icing and Coconut. Lamingtons started to appear in recipe books in the early 1900's and were named after Charles Wallace Baillie, Lord Lamington. He was the governor of Queensland from 1895-1901.

Now if you have never heard of Lamington's l urge you to try them!

Chocolate Lamington Recipe
ingredients
120g butter
2/3 Cup Caster Sugar
2 Eggs
1/2 Cup Milk
2 Cups Self Raising Flour
Vanilla Extract or Essence
Pinch Salt

Chocolate Icing
1 2/3 Cups of Icing Sugar
4 Tblspns Cocoa
Boiling Water
Vanilla Extract or Essence
Dessicated Coconut (shredded)

Method
Preheat oven to 180°C / 350°F Grease and flour a shallow square cake tin.

Beat Butter and Sugar until light and creamy. Add Vanilla. Beat in Eggs, one at a time. Sift Flour and Salt together. Add alternately to mixture with the Milk. Mix lightly to form a soft mix.

Spoon into the Cake tin and bake for approx. 1/2 hour or until cake is cooked. When cold, cut into uniform sized squares.

Dip each square of Cake in the Chocolate Icing (see below) and then roll in the Coconut. Set aside for the Icing to set.
Tip - place a square of sponge cake on the end of a fork prior to dipping. This will be less messy as you need to completely cover each square in Chocolate and then Coconut.

Chocolate Icing
Sift Icing Sugar into a bowl. Blend Cocoa with the Boiling Water to make a smooth paste. Mix into the Icing Sugar, adding a little more boiling water at a time, if needed. Add Vanilla. The Icing should be the consistency of pouring cream, for ease of dipping.

Enjoy!

Y x

Wednesday, January 13, 2010

Apricot and Almond Biscotti

  • Here's another dessert that l made for my Christmas buffet, for someone (ie me) who doesn't like nuts I didn't mine these!
For something extra l added the zest of one lemon.

Enjoy!

Yx

  • 2 cups all-purpose flour
  • 3/4 cup sugar
  • 1 1/2 teaspoons baking powder
  • 1/2 teaspoon salt
  • 1/2 stick (1/4 cup) cold unsalted butter, cut into small pieces
  • 1 whole large egg, lightly beaten
  • 1/3 cup whole milk
  • 1/2 teaspoon vanilla extract
  • 1/4 teaspoon almond extract
  • 1 cup whole almonds with skins (5 1/2 oz), toasted and cooled
  • 1 cup dried apricots (6 oz), quartered
  • 1 large egg yolk beaten with 1 tablespoon water for egg wash

Preheat oven to 180°F.

Whisk together flour, sugar, baking powder, and salt in a bowl. Blend in butter with a pastry blender or your fingertips until mixture resembles coarse meal. Add whole egg, milk, and extracts, stirring with a fork until a soft dough forms, then knead in almonds.

Divide dough between 2 sheets of wax paper, then form into 2 equal mounds and flatten each mound into a 5-inch disk. Put half of apricots in center of 1 disk and fold dough over apricots to enclose them (use wax paper as an aid if necessary), then transfer to a parchment-lined baking sheet. Form into a 14- by 2 1/2-inch log lengthwise on 1 side of baking sheet, spreading dough with wet hands. Make another log with remaining dough and apricots, arranging it about 4 inches from first log.

Brush logs with egg wash and bake in middle of oven until pale golden and firm, about 20 minutes. Cool on baking sheet on a rack 20 minutes.

Reduce oven temperature to 150°F while logs cool.

Carefully transfer baked logs to a cutting board using 2 wide metal spatulas, then cut logs diagonally into 1/2-inch-wide slices with a large heavy knife.

Line baking sheet with a clean sheet of baking paper. Stand slices, curved sides up, 1/2 inch apart on baking sheet and bake in upper third of oven until biscotti are dry, about 30 minutes (they will become hard as they cool). Transfer biscotti to rack to cool.